2022. 11. 19. 12:44ㆍ개발/Google
유튜브 링크
https://www.youtube.com/watch?v=PUfkYYumwCI
Google에서 제공하는 Dialogflow 기능이 있다.
https://dialogflow.cloud.google.com/
Dialogflow
Updating Actions on Google...
dialogflow.cloud.google.com
위 링크에 들어가면 다양한 기능을 구현할 수 있다.
기본적으로 Dialogflow는 Google의 음성인식 기능 및
메신저 기능을 활용할 때 쓰인다.
나는 Google assistant 와 Dialogflow messenger와 연동할 때 사용한다.

이런 식으로 스마트폰에서 음성인식으로 Google assistant를 사용한다.
이번 포스팅은 음성인식 말고 Dialogflow messenger를 사용한다.
동작 흐름
1. AWS Instance( 가상 서버 ) 에 Node-red 를 설치해서 Web 생성
2. Dialogflow - firebase - Arduino 연동
3. Web 소스에 Dialogflow messenger 추가
4. Web에서 명령어로 Arduino 와 연결된 PLC 원격제어
1. Dialogflow Intents 설정

Dialogflow 에 접속하면 Intents가 있다.
사용자의 입력부를 처리하는 카테고리다.
음성/텍스트로 input 되는 데이터를 다룰 수 있다.
- Welcome event 설정


일단 기본 Welcome event 를 설정한다.
기본제공 Intent 중 Default Welcome Intent 를 위와 같이 수정.

위와 같이 나타나는 걸 확인할 수 있음.
- 도움말 기능 설정
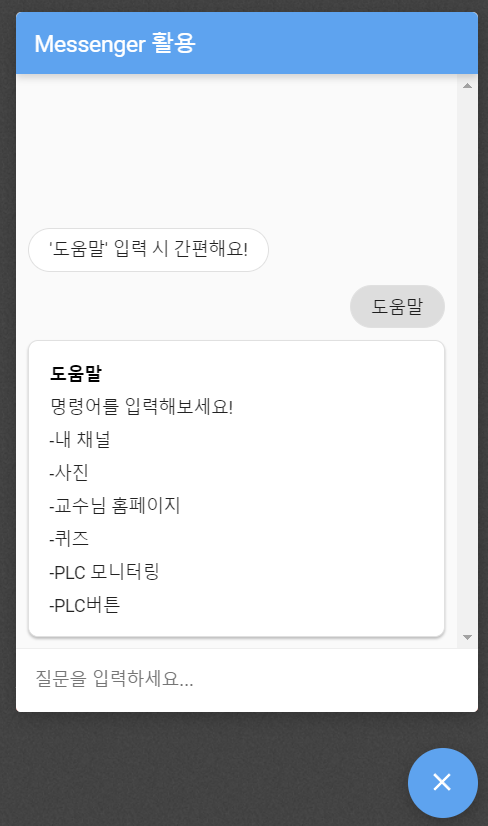
메신저에서 입력이 '도움말' 로 들어왔을 때
Responses - Custom payload 를 아래와 같이 수정
{
  "richContent": [
    [
      {
        "title": "도움말",
        "text": [
          "명령어를 입력해보세요!",
          "-내 채널",
          "-사진",
          "-교수님 홈페이지",
          "-퀴즈",
          "-PLC 모니터링",
          "-PLC버튼"
        ],
        "type": "description"
      }
    ]
  ]
}
- PLC 제어 처리부 설정

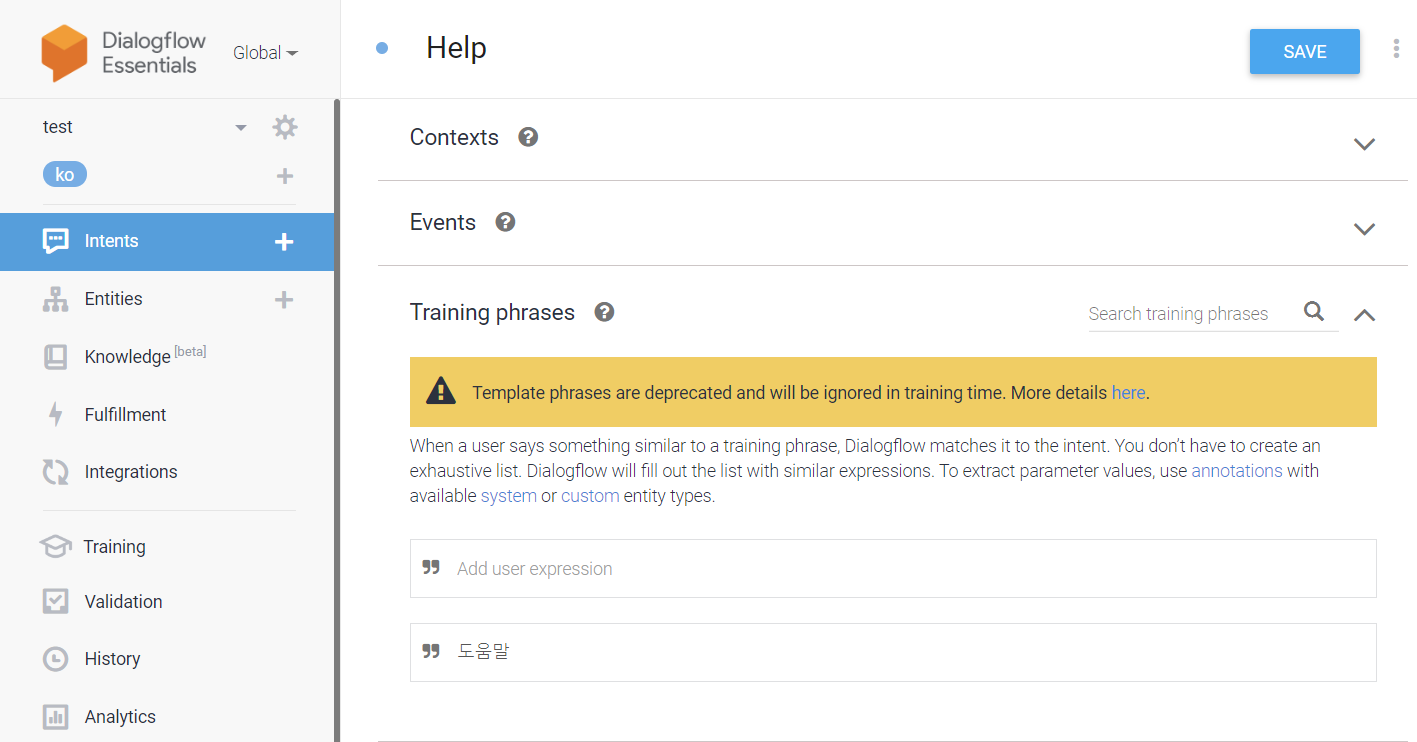
Intent를 하나 생성 후 Training phrases를 위와 같이 설정한다.
사용자의 음성/텍스트 input 처리 동작을 설정 해준다.

예를 들어 '1번 켜' 가 인식되면
- 1 위치에 인식된 값을 no 로 ( 숫자형식만 )
- 켜 위치에 인식된 값을 on 로 저장한다. ( 모든형식 )

텍스트 응답은 저장된 no 와 on 을 불러와서
( )번 ( ) 실행합니다 포맷으로 출력한다. 테스트를 해본다.

위와 같이 성공적으로 인식된다. 사실 Training phrases 에 1번 켜 / 1번 꺼 두 가지만 추가해도
나머지 2,3,4 번도 정상적으로 동작한다. 애초에 그 위치의 숫자를 인식하기 때문.
굳이 2번 켜 3번 켜 4번 켜 일일이 추가하지 않아도 됨
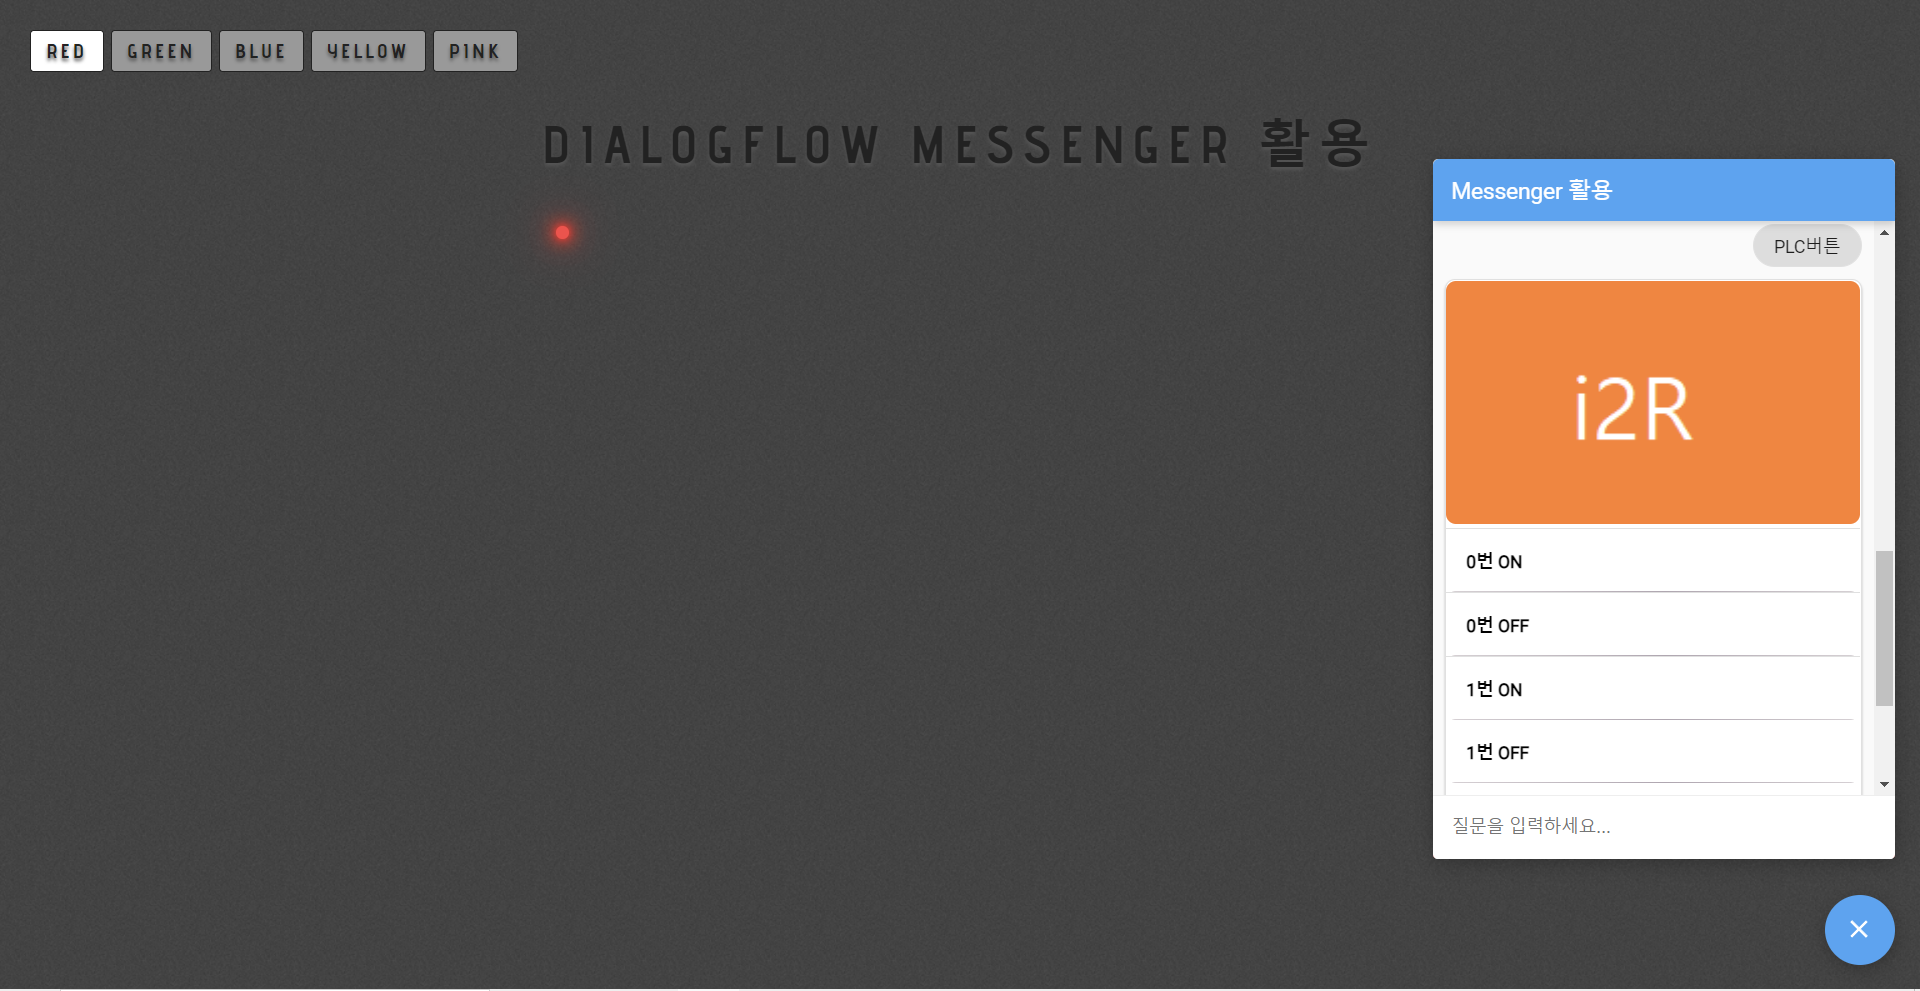
- PLC 버튼 리스트 설정

메신저에서 입력이 'PLC 버튼' 으로 들어왔을 때
Responses - Custom payload 를 아래와 같이 수정
{
  "richContent": [
    [
      {
        "type": "divider"
      },
      {
        "event": {
          "parameters": {
            "on": "켜",
            "no": 0
          },
          "name": "order"
        },
        "languageCode": "ko",
        "type": "list",
        "title": "0번 ON"
      },
      {
        "type": "divider"
      },
      {
        "title": "0번 OFF",
        "type": "list",
        "languageCode": "ko",
        "event": {
          "name": "order",
          "parameters": {
            "on": "꺼",
            "no": 0
          }
        }
      },
      {
        "type": "divider"
      },
      {
        "title": "1번 ON",
        "event": {
          "parameters": {
            "no": 1,
            "on": "켜"
          },
          "name": "order"
        },
        "type": "list",
        "languageCode": "ko"
      },
      {
        "title": "1번 OFF",
        "languageCode": "ko",
        "event": {
          "parameters": {
            "on": "꺼",
            "no": 1
          },
          "name": "order"
        },
        "type": "list"
      },
      {
        "type": "list",
        "title": "2번 ON",
        "event": {
          "parameters": {
            "on": "켜",
            "no": 2
          },
          "name": "order"
        },
        "languageCode": "ko"
      },
      {
        "event": {
          "name": "order",
          "parameters": {
            "no": 2,
            "on": "꺼"
          }
        },
        "title": "2번 OFF",
        "languageCode": "ko",
        "type": "list"
      },
      {
        "event": {
          "parameters": {
            "no": 3,
            "on": "켜"
          },
          "name": "order"
        },
        "languageCode": "ko",
        "type": "list",
        "title": "3번 ON"
      },
      {
        "title": "3번 OFF",
        "type": "list",
        "languageCode": "ko",
        "event": {
          "name": "order",
          "parameters": {
            "on": "꺼",
            "no": 3
          }
        }
      }
    ]
  ]
}
2. Dialogflow - Firebase 연동
Firebase
Firebase는 고품질 앱을 빠르게 개발하고 비즈니스를 성장시키는 데 도움이 되는 Google의 모바일 플랫폼입니다.
firebase.google.com
위 링크에 접속하면 firebaes 기능을 사용할 수 있다.
Google 에서 제공하는 플랫폼이다.
Dialogflow 에서 프로젝트를 생성했다면 자동으로 firebase 에도 생성되거나, 생성하겠냐고 물어볼 것이다.
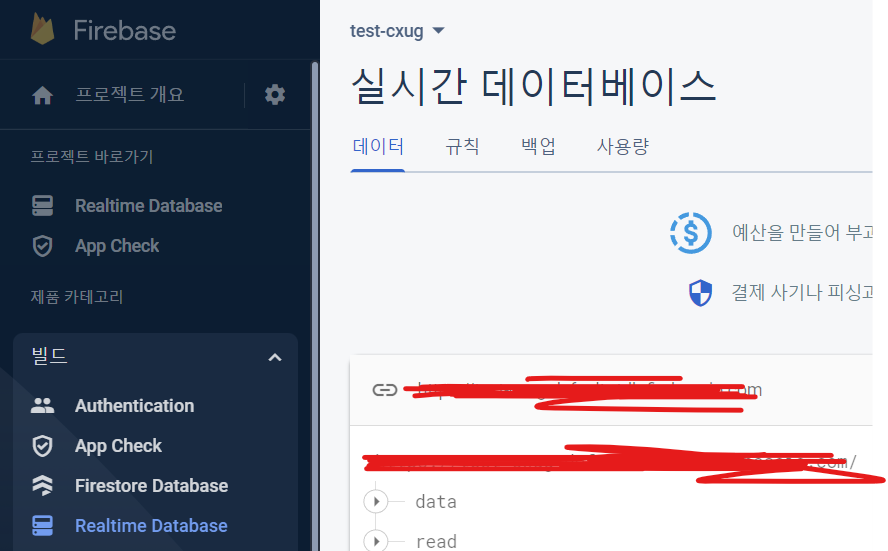
Firebase 에서 Realtime Database 를 생성한다.
테스트 버전으로 생성 하면 아래와 같이 URL 이 생성된다. 추후에 연동 시 사용된다.
Dialogflow Fulfillment 수정 ( firebase URL )

Dialogflow 의 Fulfillment 카테고리에 접근한다.
초기에는 접근 시 자동으로 Firebase 로 안내해준다.
Firebase 에 접근해서 요금제 설정을 원하는대로 설정한다.
제일 저렴한 종량제 요금제를 추천한다. 데이터를 많이 다루지 않아서
종량제 요금제를 선택해도 웬만하면 무료로 테스트 진행 가능하다.
Fulfillment - index.js 수정
Firebase 와 연동하기 위해서 Fulfillment 의 index.js 파일을 수정한다.
// See https://github.com/dialogflow/dialogflow-fulfillment-nodejs
// for Dialogflow fulfillment library docs, samples, and to report issues
'use strict';

const functions = require('firebase-functions');
const admin = require('firebase-admin');
const {WebhookClient} = require('dialogflow-fulfillment');
const {Card, Suggestion} = require('dialogflow-fulfillment');

admin.initializeApp({
  credential: admin.credential.applicationDefault(),
  databaseURL:'ws://****-****-default-rtdb.firebaseio.com/' // input your firebase url
});

process.env.DEBUG = 'dialogflow:debug'; // enables lib debugging statements

exports.dialogflowFirebaseFulfillment = functions.https.onRequest((request, response) => {
  const agent = new WebhookClient({ request, response });
  console.log('Dialogflow Request headers: ' + JSON.stringify(request.headers));
  console.log('Dialogflow Request body: ' + JSON.stringify(request.body));

  function welcome(agent) {
    agent.add(`Welcome to my agent!`);
  }

  function fallback(agent) {
    agent.add(`I didn't understand`);
    agent.add(`I'm sorry, can you try again?`);
  }

  // // Uncomment and edit to make your own intent handler
  // // uncomment `intentMap.set('your intent name here', yourFunctionHandler);`
  // // below to get this function to be run when a Dialogflow intent is matched
  // function yourFunctionHandler(agent) {
  //   agent.add(`This message is from Dialogflow's Cloud Functions for Firebase editor!`);
  //   agent.add(new Card({
  //       title: `Title: this is a card title`,
  //       imageUrl: 'https://developers.google.com/actions/images/badges/XPM_BADGING_GoogleAssistant_VER.png',
  //       text: `This is the body text of a card.  You can even use line\n  breaks and emoji! 💁`,
  //       buttonText: 'This is a button',
  //       buttonUrl: 'https://assistant.google.com/'
  //     })
  //   );
  //   agent.add(new Suggestion(`Quick Reply`));
  //   agent.add(new Suggestion(`Suggestion`));
  //   agent.setContext({ name: 'weather', lifespan: 2, parameters: { city: 'Rome' }});
  // }

  // // Uncomment and edit to make your own Google Assistant intent handler
  // // uncomment `intentMap.set('your intent name here', googleAssistantHandler);`
  // // below to get this function to be run when a Dialogflow intent is matched
  // function googleAssistantHandler(agent) {
  //   let conv = agent.conv(); // Get Actions on Google library conv instance
  //   conv.ask('Hello from the Actions on Google client library!') // Use Actions on Google library
  //   agent.add(conv); // Add Actions on Google library responses to your agent's response
  // }
  // // See https://github.com/dialogflow/fulfillment-actions-library-nodejs
  // // for a complete Dialogflow fulfillment library Actions on Google client library v2 integration sample
  function handleOrder(agent) {
    const no = agent.parameters.no;
    const on = agent.parameters.on;
    var onValue = 0;
    if(on == '켜')
      onValue = 1;
    return admin.database().ref('data').set({
      no:no,
      on:onValue
    });
  }
  // Run the proper function handler based on the matched Dialogflow intent name
  let intentMap = new Map();
  intentMap.set('Default Welcome Intent', welcome);
  intentMap.set('Default Fallback Intent', fallback);
  intentMap.set('order', handleOrder);
  // intentMap.set('your intent name here', yourFunctionHandler);
  // intentMap.set('your intent name here', googleAssistantHandler);
  agent.handleRequest(intentMap);
});
위 코드 중에서 아래 부분만 수정하면 본인의 firebase 와 연동할 수 있다.
databaseURL 부분을 본인 firebase 의 Realtime Database URL 로 설정한다.
admin.initializeApp({
  credential: admin.credential.applicationDefault(),
  databaseURL:'ws://****-****-default-rtdb.firebaseio.com/' // input your firebase url
});
  function handleOrder(agent) {
    const no = agent.parameters.no;
    const on = agent.parameters.on;
    var onValue = 0;
    if(on == '켜')
      onValue = 1;
    return admin.database().ref('data').set({
      no:no,
      on:onValue
    });
  }
위 함수가 직접적으로 데이터를 처리해서 Firebase 에 연동하는 부분이다.
Dialogflow agent 에서 들어온 no, on 값을 no, on 변수를 생성해서 저장하고
그 값에 따라서 onValue 변수를 반환한다.
반환된 값을 database.set 로 no: 반환된 no, on: 반환된 onValue 포맷으로
URL에 의해 연동된 Firebase 로 전송한다.
Fulfillment - package.json 수정
package.json 도 아래와 같이 수정한다. 기능들의 버전을 맞춰주기 위함이다.
{
  "name": "dialogflowFirebaseFulfillment",
  "description": "This is the default fulfillment for a Dialogflow agents using Cloud Functions for Firebase",
  "version": "0.0.1",
  "private": true,
  "license": "Apache Version 2.0",
  "author": "Google Inc.",
  "engines": {
    "node": "10"
  },
  "scripts": {
    "start": "firebase serve --only functions:dialogflowFirebaseFulfillment",
    "deploy": "firebase deploy --only functions:dialogflowFirebaseFulfillment"
  },
  "dependencies": {
    "actions-on-google": "^2.12.0",
    "firebase-admin": "^8.0.0",
    "firebase-functions": "^3.2.0",
    "dialogflow": "^0.6.0",
    "dialogflow-fulfillment": "^0.5.0"
  }
}
Dialogflow - Firebase 연동 테스트
이제 Dialogflow 에서 '1번 켜' 를 테스트 해본다.


위와 같이 Dialogflow 에서 Firebase 로 데이터를 전송하는 모습이다.
3. Arduino ( ESP8266 ) - Firebase 연동
//FirebaseESP8266.h must be included before ESP8266WiFi.h
#include "FirebaseESP8266.h"
#include <ESP8266WiFi.h>
#include <SoftwareSerial.h>
#include "CRC.h"
#define FIREBASE_HOST "****-****-default-rtdb.firebaseio.com/" //Without http:// or https:// schemes
#define FIREBASE_AUTH "************************ input your Firebase_auth"
#define WIFI_SSID " input your wifi SSID "
#define WIFI_PASSWORD " input your wifi PW "

//Define FirebaseESP8266 data object
FirebaseData firebaseData1;
FirebaseData firebaseData2;
FirebaseData firebaseData;

unsigned long sendDataPrevMillis = 0;
String path = "/data";
uint16_t count = 0;

SoftwareSerial mySerial(D7, D4); // RX,Tx
int act=0,outPlc=0;
int Out[8]={0},In[10]={0};  // plc 입력과 출력 저장
String inputString = "";         // 받은 문자열
String sIn="",sInPre="";  // 입력값이 달라질 때만 mqtt로 송신

unsigned long previousMillis = 0;
const long interval = 1000;

void doTick();
void printResult(FirebaseData &data);
void printResult(StreamData &data);
void outResult(StreamData &data);
void crd16Rtu();
void plcInData();
void serialEvent();

void streamCallback(StreamData data)
{
  Serial.println("Stream Data1 available...");
  Serial.println("STREAM PATH: " + data.streamPath());
  Serial.println("EVENT PATH: " + data.dataPath());
  if(data.dataPath()=="/no"){
    Serial.println("테스트");
  }
  Serial.println("DATA TYPE: " + data.dataType());
  Serial.println("EVENT TYPE: " + data.eventType());
  Serial.print("VALUE: ");
  printResult(data);
  Serial.println();
  outResult(data);
}

void streamTimeoutCallback(bool timeout)
{
  if (timeout)
  {
    Serial.println();
    Serial.println("Stream timeout, resume streaming...");
    Serial.println();
  }
}

void setup()
{
  Serial.begin(19200);
  mySerial.begin(19200);

  WiFi.begin(WIFI_SSID, WIFI_PASSWORD);
  Serial.print("Connecting to Wi-Fi");
  while (WiFi.status() != WL_CONNECTED)
  {
    Serial.print(".");
    delay(300);
  }
  Serial.println();
  Serial.print("Connected with IP: ");
  Serial.println(WiFi.localIP());
  Serial.println();

  Firebase.begin(FIREBASE_HOST, FIREBASE_AUTH);
  Firebase.reconnectWiFi(true);

  //Set the size of WiFi rx/tx buffers in the case where we want to work with large data.
  firebaseData1.setBSSLBufferSize(1024, 1024);
  //Set the size of HTTP response buffers in the case where we want to work with large data.
  firebaseData1.setResponseSize(1024);
  //Set the size of WiFi rx/tx buffers in the case where we want to work with large data.
  firebaseData2.setBSSLBufferSize(1024, 1024);
  //Set the size of HTTP response buffers in the case where we want to work with large data.
  firebaseData2.setResponseSize(1024);

  if (!Firebase.beginStream(firebaseData1, path))
  {
    Serial.println("------------------------------------");
    Serial.println("Can't begin stream connection...");
    Serial.println("REASON: " + firebaseData1.errorReason());
    Serial.println("------------------------------------");
    Serial.println();
  }
  Firebase.setStreamCallback(firebaseData1, streamCallback, streamTimeoutCallback);
  plcInData();
}

void loop()
{
  doTick();
  serialEvent();
}

//1초 마다 실행되는 시간함수
void doTick() {
  unsigned long currentMillis = millis();
  if (currentMillis - previousMillis >= interval) {
    // save the last time you blinked the LED
    previousMillis = currentMillis;
    crd16Rtu();
  }
}

void printResult(FirebaseData &data)
{

  if (data.dataType() == "int")
    Serial.println(data.intData());
  else if (data.dataType() == "float")
    Serial.println(data.floatData(), 5);
  else if (data.dataType() == "double")
    printf("%.9lf\n", data.doubleData());
  else if (data.dataType() == "boolean")
    Serial.println(data.boolData() == 1 ? "true" : "false");
  else if (data.dataType() == "string")
    Serial.println(data.stringData());
  else if (data.dataType() == "json")
  {
    Serial.println();
    FirebaseJson &json = data.jsonObject();
    //Print all object data
    Serial.println("Pretty printed JSON data:");
    String jsonStr;
    json.toString(jsonStr, true);
    Serial.println(jsonStr);
    Serial.println();
    Serial.println("Iterate JSON data:");
    Serial.println();
    size_t len = json.iteratorBegin();
    String key, value = "";
    int type = 0;
    for (size_t i = 0; i < len; i++)
    {
      json.iteratorGet(i, type, key, value);
      Serial.print(i);
      Serial.print(", ");
      Serial.print("Type: ");
      Serial.print(type == FirebaseJson::JSON_OBJECT ? "object" : "array");
      if (type == FirebaseJson::JSON_OBJECT)
      {
        Serial.print(", Key: ");
        Serial.print(key);
      }
      Serial.print(", Value: ");
      Serial.println(value);
    }
    json.iteratorEnd();
  }
  else if (data.dataType() == "array")
  {
    Serial.println();
    //get array data from FirebaseData using FirebaseJsonArray object
    FirebaseJsonArray &arr = data.jsonArray();
    //Print all array values
    Serial.println("Pretty printed Array:");
    String arrStr;
    arr.toString(arrStr, true);
    Serial.println(arrStr);
    Serial.println();
    Serial.println("Iterate array values:");
    Serial.println();
    for (size_t i = 0; i < arr.size(); i++)
    {
      Serial.print(i);
      Serial.print(", Value: ");

      FirebaseJsonData &jsonData = data.jsonData();
      //Get the result data from FirebaseJsonArray object
      arr.get(jsonData, i);
      if (jsonData.typeNum == FirebaseJson::JSON_BOOL)
        Serial.println(jsonData.boolValue ? "true" : "false");
      else if (jsonData.typeNum == FirebaseJson::JSON_INT)
        Serial.println(jsonData.intValue);
      else if (jsonData.typeNum == FirebaseJson::JSON_DOUBLE)
        printf("%.9lf\n", jsonData.doubleValue);
      else if (jsonData.typeNum == FirebaseJson::JSON_STRING ||
               jsonData.typeNum == FirebaseJson::JSON_NULL ||
               jsonData.typeNum == FirebaseJson::JSON_OBJECT ||
               jsonData.typeNum == FirebaseJson::JSON_ARRAY)
        Serial.println(jsonData.stringValue);
    }
  }
}

void printResult(StreamData &data)
{

  if (data.dataType() == "int")
    Serial.println(data.intData());
  else if (data.dataType() == "float")
    Serial.println(data.floatData(), 5);
  else if (data.dataType() == "double")
    printf("%.9lf\n", data.doubleData());
  else if (data.dataType() == "boolean")
    Serial.println(data.boolData() == 1 ? "true" : "false");
  else if (data.dataType() == "string")
    Serial.println(data.stringData());
  else if (data.dataType() == "json")
  {
    Serial.println();
    FirebaseJson *json = data.jsonObjectPtr();
    //Print all object data
    Serial.println("Pretty printed JSON data:");
    String jsonStr;
    json->toString(jsonStr, true);
    Serial.println(jsonStr);
    Serial.println();
    Serial.println("Iterate JSON data:");
    Serial.println();
    size_t len = json->iteratorBegin();
    String key, value = "";
    int type = 0;
    for (size_t i = 0; i < len; i++)
    {
      json->iteratorGet(i, type, key, value);
      Serial.print(i);
      Serial.print(", ");
      Serial.print("Type: ");
      Serial.print(type == FirebaseJson::JSON_OBJECT ? "object" : "array");
      if (type == FirebaseJson::JSON_OBJECT)
      {
        Serial.print(", Key: ");
        Serial.print(key);
      }
      Serial.print(", Value: ");
      Serial.println(value);
    }
    json->iteratorEnd();
  }
  else if (data.dataType() == "array")
  {
    Serial.println();
    //get array data from FirebaseData using FirebaseJsonArray object
    FirebaseJsonArray *arr = data.jsonArrayPtr();
    //Print all array values
    Serial.println("Pretty printed Array:");
    String arrStr;
    arr->toString(arrStr, true);
    Serial.println(arrStr);
    Serial.println();
    Serial.println("Iterate array values:");
    Serial.println();

    for (size_t i = 0; i < arr->size(); i++)
    {
      Serial.print(i);
      Serial.print(", Value: ");

      FirebaseJsonData *jsonData = data.jsonDataPtr();
      //Get the result data from FirebaseJsonArray object
      arr->get(*jsonData, i);
      if (jsonData->typeNum == FirebaseJson::JSON_BOOL)
        Serial.println(jsonData->boolValue ? "true" : "false");
      else if (jsonData->typeNum == FirebaseJson::JSON_INT)
        Serial.println(jsonData->intValue);
      else if (jsonData->typeNum == FirebaseJson::JSON_DOUBLE)
        printf("%.9lf\n", jsonData->doubleValue);
      else if (jsonData->typeNum == FirebaseJson::JSON_STRING ||
               jsonData->typeNum == FirebaseJson::JSON_NULL ||
               jsonData->typeNum == FirebaseJson::JSON_OBJECT ||
               jsonData->typeNum == FirebaseJson::JSON_ARRAY)
        Serial.println(jsonData->stringValue);
    }
  }
}

void outResult(StreamData &data)
{
  int onValue=1;
  int noPlc=0;
  if (data.dataType() == "int"){
    onValue=data.intData();
  }
  else if (data.dataType() == "string") {
    Serial.println("string data");
    if(data.stringData() != "1")
      onValue=0;
    Serial.println(data.stringData());
  }
  else if (data.dataType() == "json")
  {
    Serial.println("json data");
    FirebaseJson *json = data.jsonObjectPtr();
    String jsonStr;
    json->toString(jsonStr, true);

    FirebaseJsonData jsonObj;
    json->get(jsonObj,"on");
    onValue=jsonObj.intValue;
    json->get(jsonObj,"no");
    noPlc=jsonObj.intValue;
  }

  Serial.println("---data received---");
  Serial.println(noPlc);
  Serial.println(onValue);
  Serial.println("-------------");
  outPlc=1;
  Out[noPlc]=onValue;
  crd16Rtu();
}

// 아두이노에서 RS485 출력을 내보낸다.
void crd16Rtu() {
  String s;
  int si,sj,len;
  char str[24];

  if(outPlc == 1) {  //출력
    //str[24] =  {0x00,0x0f,0x00,0x00,0x00,0x0a,0x02,0xff,0x00,0x00,0x00};  //비트연속출력 len=9
    str[0]=0x01; str[1]=0x0f; str[2]=0x00; str[3]=0x40; str[4]=0x00;
    str[5]=0x0a; str[6]=0x02; str[7]=0xff; str[8]=0x00; str[9]=0x00; str[10]=0x00;
    len=9;
    str[7]=Out[0]+Out[1]*2+Out[2]*4+Out[3]*8;
    outPlc=0;
  }
  else {    //입력
    //str[24] =  {0x00,0x02,0x00,0x00,0x00,0x08,0x00,0x00}; // 비트 입력영역 읽기 len=6
    str[0]=0x01; str[1]=0x02; str[2]=0x00; str[3]=0x00; str[4]=0x00;
    str[5]=0x08; str[6]=0x00; str[7]=0x00;
    len=6;
  }

  inputString = "";
  uint8_t * data = (uint8_t *) &str[0];
  si=crc16(data, len, 0x8005, 0xFFFF, 0x0000, true,  true  );
  sj=si&0xff;
  str[len]=sj;
  sj=si>>8;
  str[len+1]=sj;

  for(int i=0;i<len+2;i++)
    mySerial.print(str[i]);
}

void serialEvent() {
  if(mySerial.available() == false)
    return;
  while (mySerial.available()) {
    // get the new byte:
    char inChar = (char)mySerial.read();
    //Serial.print(inChar,HEX);
    // add it to the inputString:
    inputString += inChar;
  }
  //Serial.println("");
  if(outPlc!=1 && inputString.length() >= 6) {
    int b=1;
    sIn="";
    for(int i=1;i<=6;i++) {
        int c=inputString.charAt(3)&b;
        if(c!=0)
          c=0x01;
        In[i-1]=c;
        sIn+=c;
        //Serial.print(c,HEX);
        //Serial.print(" ");
        b*=2;
      }
    inputString="";
    if(sIn!=sInPre) {
      Serial.println(sIn);
      plcInData();
    }
    sInPre=sIn;
  }
}

void plcInData() {
  //FirebaseData firebaseData;
  String pathIn = "read";
  String jsonStr = "";
  FirebaseJson json1;
  FirebaseJsonData jsonObj;
  json1.set("led0", In[0]);
  json1.set("led1", In[1]);
  json1.set("led2", In[2]);
  json1.set("led3", In[3]);
  json1.set("led4", In[4]);
  json1.set("led5", In[5]);
  json1.set("led6", In[6]);
  json1.set("led7", In[7]);
  json1.toString(jsonStr, true);

  if (Firebase.set(firebaseData, pathIn, json1))
     Serial.println("Sucess");
  else
     Serial.println("FAILED");
}
ESP8266 소스다.
FirebaseESP8266.h 라이브러리를 다운받아 사용한다.
#define FIREBASE_HOST "****-****-default-rtdb.firebaseio.com/" //Without http:// or https:// schemes
#define FIREBASE_AUTH "************************ input your Firebase_auth"
#define WIFI_SSID " input your wifi SSID "
#define WIFI_PASSWORD " input your wifi PW "
Firebase_host 는 Dialogflow 에서도 입력했던 Firebase Realtime Database URL 이다.
Firebase_auth 는
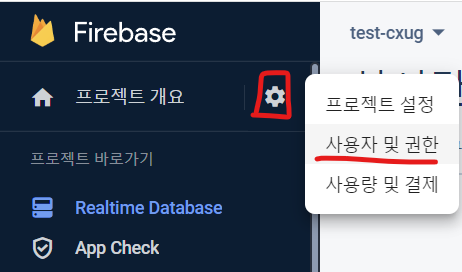

위 경로에서 확인 가능하다. 표시 버튼 클릭 후 복사해서 사용하면 된다.
Wifi SSID 와 PW 수정 후 ESP8266에 업로드 한다.
Firebase.setStreamCallback(firebaseData1, streamCallback, streamTimeoutCallback);void.setup( ) 에서 위 명령어로 callback 문을 설정한다.
void streamCallback(StreamData data)
{
  Serial.println("Stream Data1 available...");
  Serial.println("STREAM PATH: " + data.streamPath());
  Serial.println("EVENT PATH: " + data.dataPath());
  if(data.dataPath()=="/no"){
    Serial.println("테스트");
  }
  Serial.println("DATA TYPE: " + data.dataType());
  Serial.println("EVENT TYPE: " + data.eventType());
  Serial.print("VALUE: ");
  printResult(data);
  Serial.println();
  outResult(data);
}
callback 문에서 outResult(data) 함수에서 수신된 데이터 처리가 발생한다.
void outResult(StreamData &data)
{
  int onValue=1;
  int noPlc=0;
  if (data.dataType() == "int"){
    onValue=data.intData();
  }
  else if (data.dataType() == "string") {
    Serial.println("string data");
    if(data.stringData() != "1")
      onValue=0;
    Serial.println(data.stringData());
  }
  //----------------JSON 객체 데이터 처리------------------------
  else if (data.dataType() == "json")
  {
    Serial.println("json data");
    FirebaseJson *json = data.jsonObjectPtr();
    String jsonStr;
    json->toString(jsonStr, true);

    FirebaseJsonData jsonObj;
    json->get(jsonObj,"on");
    onValue=jsonObj.intValue;
    json->get(jsonObj,"no");
    noPlc=jsonObj.intValue;
  }
//-------------------------------------------------------------
  Serial.println("---data received---");
  Serial.println(noPlc);
  Serial.println(onValue);
  Serial.println("-------------");
  outPlc=1;
  Out[noPlc]=onValue;
  crd16Rtu();
}
데이터 형식에 따라서 처리하는데, Firebase Realtime Database 에 no, on 파라미터로
JSON 객체 형식으로 데이터가 연동된다.
따라서 아두이노 에서도 JSON 으로 인식한다.
on 의 이름을 가진 key를 가져와서 그 value를 아두이노 변수 onValue에 저장
no 의 이름을 가진 key를 가져와서 그 value를 아두이노 변수 noPlc 에 저장.
출력 상태를 나타내주는 환경변수 outPlc=1; 로 설정 후
Out[noPlc]=onValue; 로 RS-485 프로토콜 배열을 수정 후
crd16Rtu() 함수 실행
void crd16Rtu() {
  String s;
  int si,sj,len;
  char str[24];

  if(outPlc == 1) {  //출력
    //str[24] =  {0x00,0x0f,0x00,0x00,0x00,0x0a,0x02,0xff,0x00,0x00,0x00};  //비트연속출력 len=9
    str[0]=0x01; str[1]=0x0f; str[2]=0x00; str[3]=0x40; str[4]=0x00;
    str[5]=0x0a; str[6]=0x02; str[7]=0xff; str[8]=0x00; str[9]=0x00; str[10]=0x00;
    len=9;
    str[7]=Out[0]+Out[1]*2+Out[2]*4+Out[3]*8;
    outPlc=0;
  }
  else {    //입력
    //str[24] =  {0x00,0x02,0x00,0x00,0x00,0x08,0x00,0x00}; // 비트 입력영역 읽기 len=6
    str[0]=0x01; str[1]=0x02; str[2]=0x00; str[3]=0x00; str[4]=0x00;
    str[5]=0x08; str[6]=0x00; str[7]=0x00;
    len=6;
  }

  inputString = "";
  uint8_t * data = (uint8_t *) &str[0];
  si=crc16(data, len, 0x8005, 0xFFFF, 0x0000, true,  true  );
  sj=si&0xff;
  str[len]=sj;
  sj=si>>8;
  str[len+1]=sj;

  for(int i=0;i<len+2;i++)
    mySerial.print(str[i]);
}
이전의 처리에 의해서 outPlc 환경변수가 1 이므로
 if(outPlc == 1) {  //출력
    //str[24] =  {0x00,0x0f,0x00,0x00,0x00,0x0a,0x02,0xff,0x00,0x00,0x00};  //비트연속출력 len=9
    str[0]=0x01; str[1]=0x0f; str[2]=0x00; str[3]=0x40; str[4]=0x00;
    str[5]=0x0a; str[6]=0x02; str[7]=0xff; str[8]=0x00; str[9]=0x00; str[10]=0x00;
    len=9;
    str[7]=Out[0]+Out[1]*2+Out[2]*4+Out[3]*8;
    outPlc=0;
  }
위 부분의 코드가 실행된다.
위 함수는 RS-485 프로토콜을 전송하는 함수다.
먼저 PLC 제품의 프로토콜 포맷 확인을 한다.

위와 같은 포맷을 갖는다. 따라서
    str[0]=0x01; str[1]=0x0f; str[2]=0x00; str[3]=0x40; str[4]=0x00;
    str[5]=0x0a; str[6]=0x02; str[7]=0xff; str[8]=0x00; str[9]=0x00; str[10]=0x00;
위 프로토콜의 형식을 실행한 뒤
출력부의 위치인 str[7] 배열만 처리문으로 수정한다.
str[7]=Out[0]+Out[1]*2+Out[2]*4+Out[3]*8;Firebase의 데이터를 수신받을 때 처리했던 Out[noPlc]=onValue; 에 의해서 str[7] 의 값이 변한다.
  uint8_t * data = (uint8_t *) &str[0];
  si=crc16(data, len, 0x8005, 0xFFFF, 0x0000, true,  true  );
  sj=si&0xff;
  str[len]=sj;
  sj=si>>8;
  str[len+1]=sj;

  for(int i=0;i<len+2;i++)
    mySerial.print(str[i]);
마지막으로 CRC 값을 체크해주는 처리문을 지난 후
mySerial.print ( ) 로 인해 물리적으로 PLC와 연결된 포트로
RS-485 통신 프로토콜이 전송된다.
4. Dialogflow messenger 웹 추가

Dialogflow 의 Integrations 카테고리에 Messenger가 존재한다.

클릭하면 위와 같이 짧은 소스가 있다.
그 소스를 복사 후 웹 html 코드에 추가한다.
  <head>
    <meta charset="UTF-8">
    <script src="https://www.gstatic.com/dialogflow-console/fast/messenger/bootstrap.js?v=1"></script>
    <df-messenger
    intent="WELCOME"
    chat-title="Messenger 활용"
    agent-id="******-****-****-****-********"
    language-code="ko"
    ></df-messenger>
  </head>
나는 위와 같이 <head> 태그에 추가했다.
최종 동작
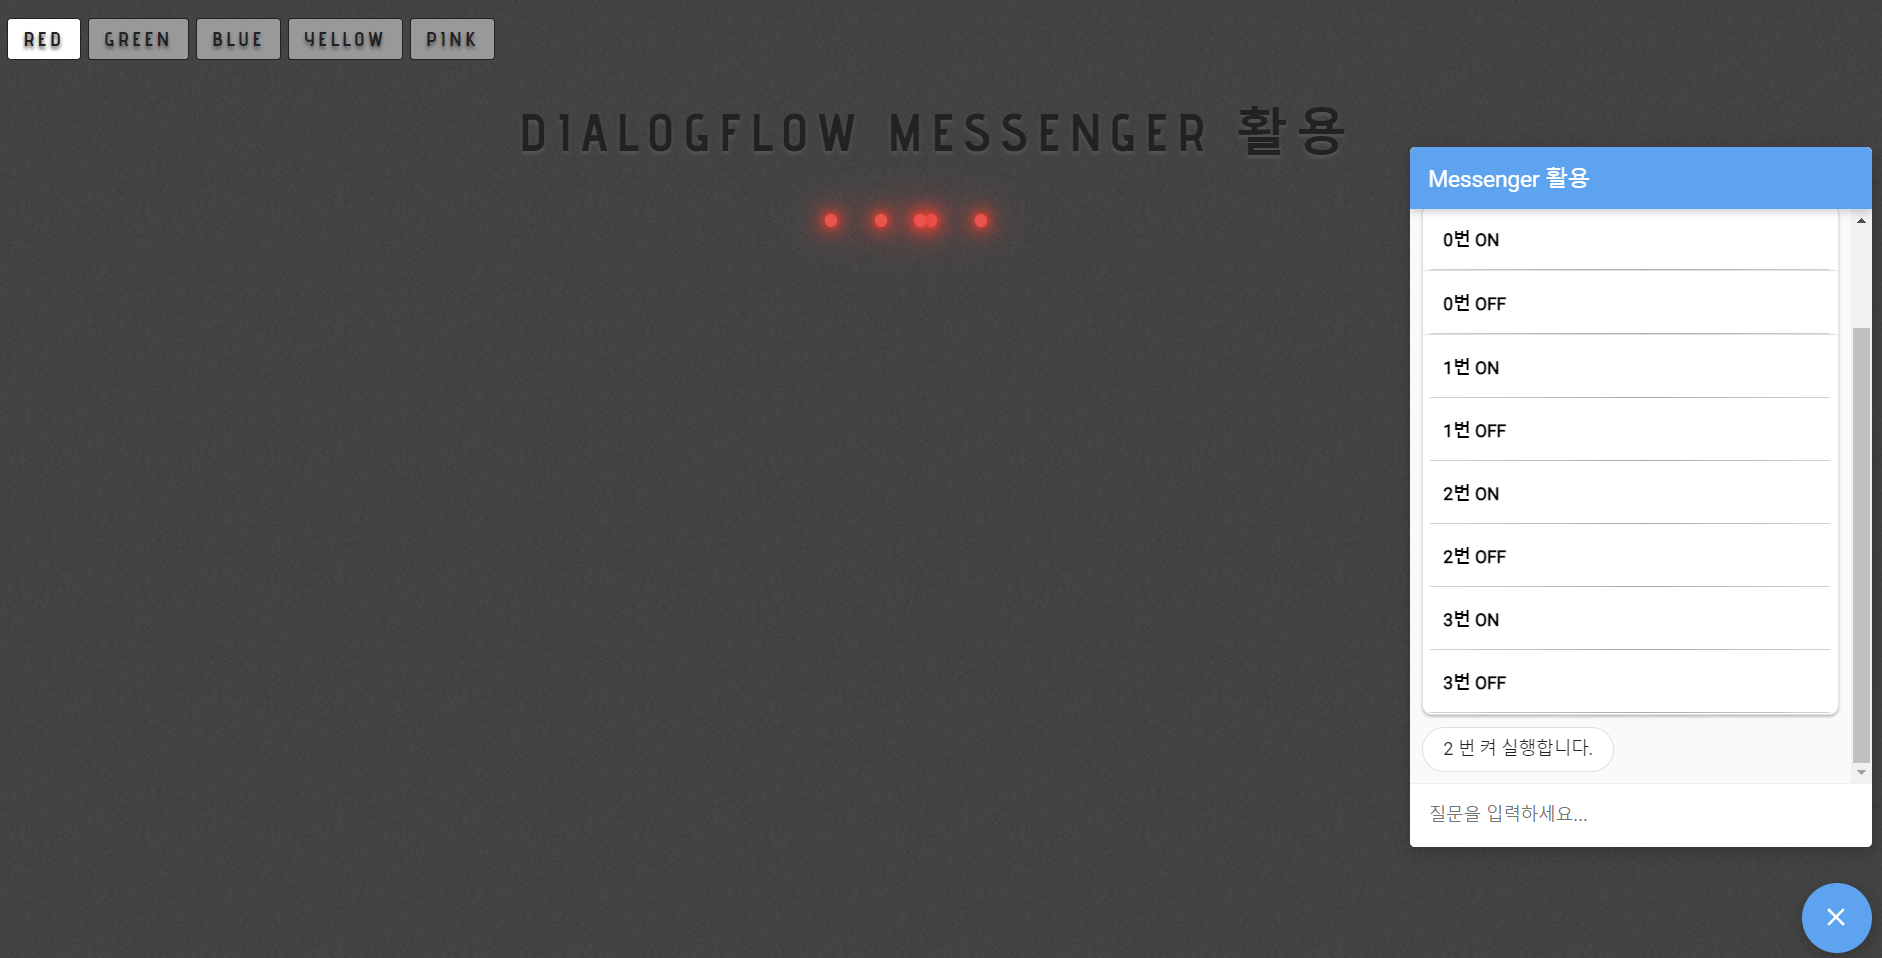


'개발 > Google' 카테고리의 다른 글
| [Google] Google Home 으로 PLC 제어 (0) | 2022.11.22 |
|---|