2022. 12. 21. 15:05ㆍ개발/Node-red
2022.12.09 - [기록/개발 노트] - [Node-red] Schedule 노드 ( mqtt x ) 제작
[Node-red] Schedule 노드 ( mqtt x ) 제작
2022.11.21 - [기록/개발 노트] - [Node-red] Schedule node 수정 - 4 [Node-red] Schedule node 수정 - 4 2022.11.21 - [기록/개발 노트] - [Node-red] Custom node 수정 - 3 [Node-red] Custom node 수정 - 3 마지막 수정 후 보완할 점들 mq
iruk.tistory.com
2022.12.07 - [기록/개발 노트] - [Node-red] Relay node 제작 - 2
[Node-red] Relay node 제작 - 2
2022.12.05 - [기록/개발 노트] - [Node-red] Relay node 제작 [Node-red] Relay node 제작 2022.11.21 - [기록/개발 노트] - [Node-red] Schedule node 수정 - 4 [Node-red] Schedule node 수정 - 4 2022.11.21 - [기록/개발 노트] - [Node-red] C
iruk.tistory.com
2022.11.21 - [기록/개발 노트] - [Node-red] Schedule node 수정 - 4
[Node-red] Schedule node 수정 - 4
2022.11.21 - [기록/개발 노트] - [Node-red] Custom node 수정 - 3 [Node-red] Custom node 수정 - 3 마지막 수정 후 보완할 점들 mqtt 통신 불안정 mqtt 통신 불안정에 따른 Node-red 서버 중지 ( cmd 에서 자주 node-red 종료
iruk.tistory.com
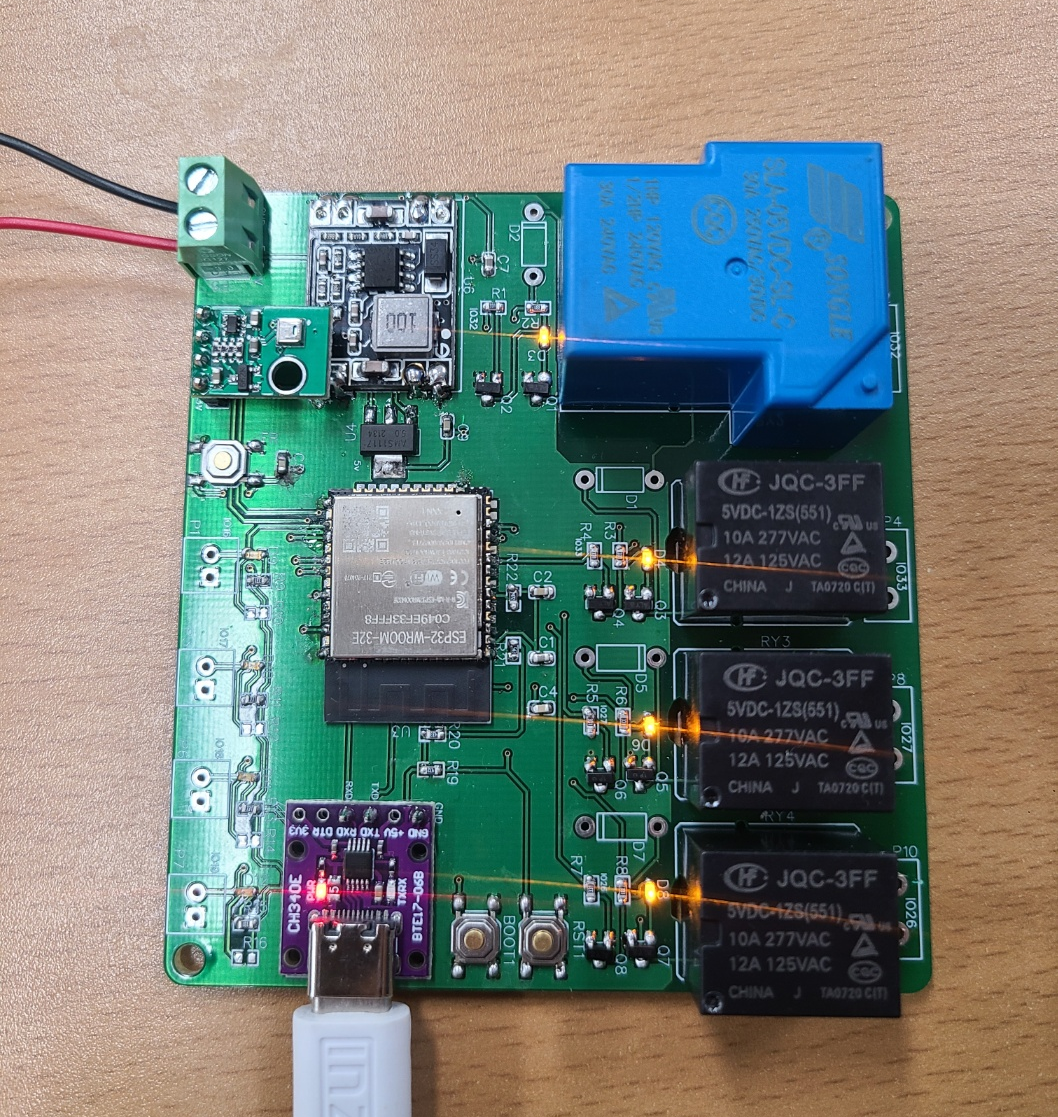
기존에 만들었던 custom node 들이다.
전부 4채널 보드의 릴레이를 동작하기 위한 기능들이다.
4개의 릴레이를 Node-red에서 간편하게
제어할 수 있도록 돕는다.
중학생도 간편하게 사용할 수 있을 정도의 접근성을 구현하기 위해
여러가지 방식들을 생각해보았다.
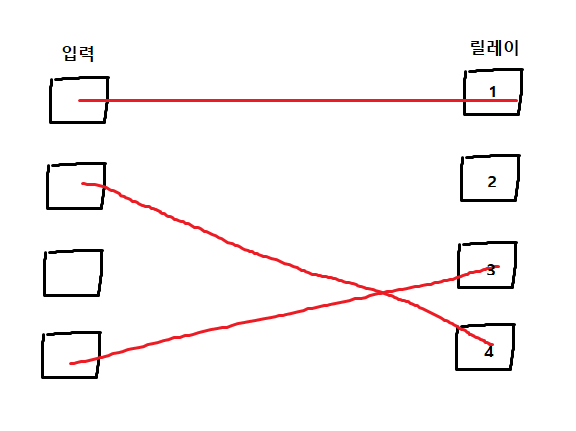
Custom node를 더블클릭 했을 때
위와 같은 화면이 나타나고
선으로 연결해 동작을 구현하면 좋겠다고 생각했다.


그렇게 제작한 Custom node의 입력을
Node-red dashboard의 기본 button 노드를 사용해
1,2,3,4 로 구분 후
Custom node 화면에서
연결된 4개의 끝단을 각각 배열에 담아
1,2,3,4 입력에 따른 동작을 출력하면 되겠다고 생각했다.
https://lts0606.tistory.com/581
HTML Canvas 사다리 타기(ladder, ghost leg, Amidakuji)
* 게시글 하단의 제 깃허브 주소를 통해 실제 구현된 모습을 볼 수 있습니다 이번에 구현한 기능은 사다리타기 기능 입니다. 사다리 타기는 주어진 세로형태의 선에 본인이 원하는 선을 붙여서
lts0606.tistory.com
HTML 로 사다리 타기를 구현한 자료를 찾았다.
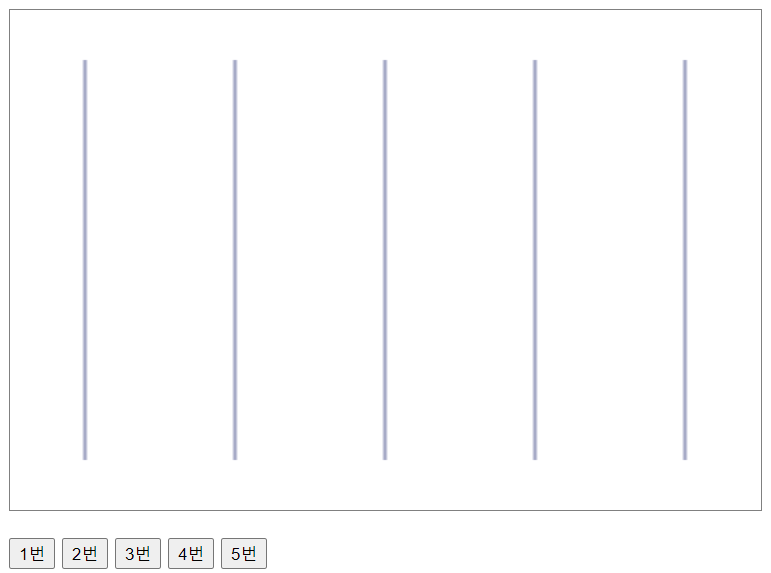
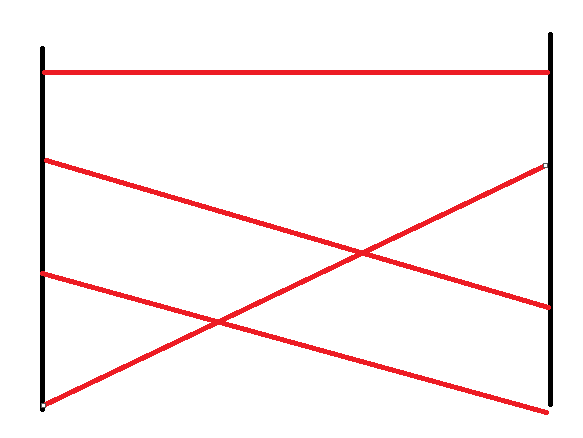
위와 같이 5개의 사다리 틀이 있다.

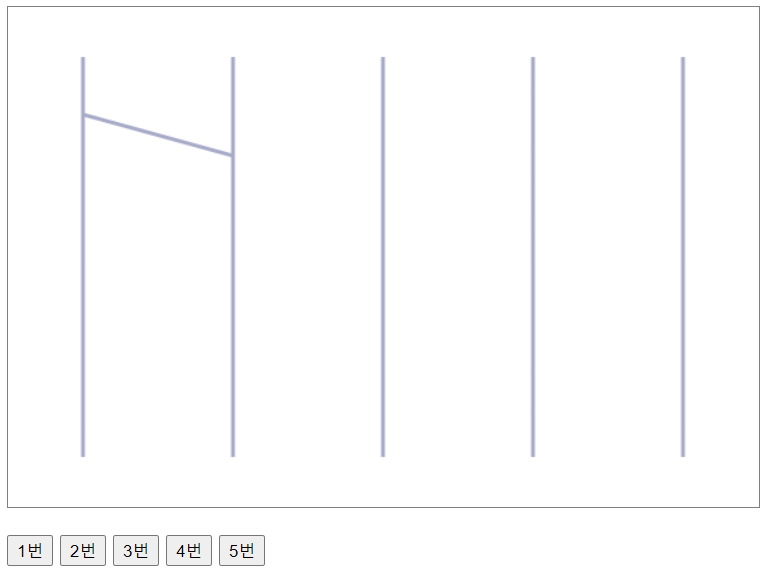
마우스로 선을 임의로 그었다 떼면
사다리에 선이 생성된다. 이런식으로 여러개의 선을 이어서
사다리 타기를 구현했다.
1번 2번 3번 4번 5번 버튼을 누르면
각 순서에 해당하는 사다리 라인의 결과를 나타낸다.
<!-- 해당 HTML 소스 -->
<!DOCTYPE HTML PUBLIC "-//W3C//DTD HTML 4.0 Transitional//EN">
<html>

<head>
    <title>ladder</title>
    <meta name="viewport" content="width=device-width, initial-scale=1">
    <meta http-equiv="Content-Type" content="text/html; charset=utf-8">
</head>

<body>
    <div style="display: inline-block;width: 602px;height: 402px;position: absolute;left: 30%;top:3%;">
        <canvas id='canvas' width="600" height="400" style="border: 1px solid gray;"> </canvas>
        <div>
            <br>
            <button type="button" id="btn1">1번</button>
            <button type="button" id="btn2">2번</button>
            <button type="button" id="btn3">3번</button>
            <button type="button" id="btn4">4번</button>
            <button type="button" id="btn5">5번</button>
        </div>
    </div>
</body>

</html>

<script src='ladder.js'>
</script>
// javascript 소스
function ladder(_id, option = {}){
const canvas = document.getElementById(_id)
let ctx = canvas.getContext('2d')
let width = canvas.width
let height = canvas.height
let line = option.line || 5 //line
let calback //콜백용 변수 입니다
let data = [ ] //모든 데이터가 y축 기준으로 정렬된 배열 입니다
let lineData = [ ] //선이 그려지고 난 뒤에 보관되는 배열 입니다
//마우스 다운여부 변수 입니다
let isClicked = false
//마우스가 다운되면서 그리는 경우 끝지점을 담는 변수 입니다
let hoverPosition = {}
//마우스 다운인 경우에 처음 기록하는 시작지점 입니다
let startBridge = null
//기본 선 굵기와 색상 입니다
let defaultLineWidth = 3
let defaultLineColor = '#A6ABCA'
_init()
_drawLine()
//초기화 함수 입니다
function _init(){
ctx.save()
ctx.clearRect(0,0,width,height)
ctx.restore()
}
//맨 처음 선을 그려줍니다
function _drawLine(){
for(let i = 0 ; i < line ; i++){
let startPosX = i / line * width + 1/line * width / 2
ctx.save()
ctx.beginPath()
ctx.lineWidth = defaultLineWidth
ctx.strokeStyle = defaultLineColor
ctx.moveTo(startPosX, height * 0.1)
ctx.lineTo(startPosX, height * 0.9)
ctx.stroke()
ctx.closePath()
ctx.restore()
let arr = [
{x : startPosX, y : height * 0.1},
{x : startPosX, y : height * 0.9}
]
data.push(arr)
}
_sort()
}
//그림을 그리는 메인 함수 입니다
function _drawDataLine(){
//기둥 선을 먼저 그리고,
for(let i = 0 ; i < line ; i++){
let startPosX = i / line * width + 1/line * width / 2
ctx.save()
ctx.beginPath()
ctx.lineWidth = defaultLineWidth
ctx.strokeStyle = defaultLineColor
ctx.moveTo(startPosX, height * 0.1)
ctx.lineTo(startPosX, height * 0.9)
ctx.stroke()
ctx.closePath()
ctx.restore()
}
//사용자가 그린 선분을 그려 줍니다
lineData.forEach(item => {
let {startBridge, endBridge} = item
ctx.save()
ctx.beginPath()
ctx.lineWidth = defaultLineWidth
ctx.strokeStyle = defaultLineColor
ctx.moveTo(startBridge.x, startBridge.y)
ctx.lineTo(endBridge.x, endBridge.y)
ctx.stroke()
ctx.closePath()
ctx.restore()
})
_sort()
}
//y값을 기준으로 내림순으로 정렬 합니다
function _sort(){
data.map( arg=>{
arg.sort((a, b) => a.y - b.y)
return arg
})
}
//선분을 연결하기 위한 인덱스를 만드는 함수 입니다
function _makeid(length) {
let result = ''
let characters = 'ABCDEFGHIJKLMNOPQRSTUVWXYZabcdefghijklmnopqrstuvwxyz0123456789'
let charactersLength = characters.length
for ( let i = 0; i < length; i++ ) {
result += characters.charAt(Math.floor(Math.random() * charactersLength))
}
return result
}
//내부 판별 함수 입니다
function _isInSide(x1,y1){
let obj = {}
let len = width * 3
let targetIndex
data.forEach( (element, i) =>{
element.forEach(item => {
let start_x = item.x
let start_y = item.y
let x = start_x - x1
let y = start_y - y1
let my_len = Math.sqrt(Math.abs(x * x) + Math.abs(y * y)) //가장 짧은 구간을 찾습니다
if(my_len < len){
len = my_len
obj = item
targetIndex = i
}
})
})
return {object : obj, dataIndex : targetIndex}
}
//마우스가 움직일 때 이벤트 입니다
canvas.addEventListener('mousemove', (event) =>{
if(!ctx) return
if(isClicked){ //마우스가 Down인 경우에만 동작하여 hover 효과를 그려 줍니다
let x1 = event.clientX - canvas.parentElement.offsetLeft || canvas.offsetLeft
let y1 = event.clientY - canvas.parentElement.offsetTop || canvas.offsetTop
_init()
_drawDataLine()
ctx.save()
ctx.beginPath()
ctx.lineCap = 'round'
ctx.lineJoin = 'round'
ctx.lineWidth = 4.25
ctx.strokeStyle = '#959595'
ctx.moveTo(startBridge.originX, startBridge.originY)
ctx.lineTo(x1, y1)
ctx.stroke()
ctx.closePath()
ctx.restore()
}
})
//마우스 다운 이벤트
canvas.addEventListener('mousedown', (event) =>{
if(!ctx) return
isClicked = true
let x1 = event.clientX - canvas.parentElement.offsetLeft || canvas.offsetLeft
let y1 = event.clientY - canvas.parentElement.offsetTop || canvas.offsetTop
if(isClicked){
let startTarget = _isInSide(x1,y1) //시작점을 기록 합니다
startBridge = {...startTarget, x: startTarget.object.x, y: y1, originX:x1, originY : y1} //x축은 그려진 선 기준값을 대입 합니다
}
})
//마우스 업 이벤트
canvas.addEventListener('mouseup', (event) =>{
if(!ctx) return
hoverPosition = {}
if(isClicked){ //마우스가 다운된 상태의 조건이 충족하면,
let x1 = event.clientX - canvas.parentElement.offsetLeft || canvas.offsetLeft
let y1 = event.clientY - canvas.parentElement.offsetTop || canvas.offsetTop
let endBridge = _isInSide(x1,y1) //가장 마지막의 선 지점값을 가져 옵니다
endBridge = {...endBridge, x: endBridge.object.x, y: y1} //x축은 그려진 선 기준값을 대입 합니다
//같은 선분 또는 옆 영역을 뛰어넘어가는 경우 등록하지 않습니다
if(startBridge.dataIndex == endBridge.dataIndex || Math.abs(startBridge.dataIndex - endBridge.dataIndex) > 1) {
isClicked = false
hoverPosition = {}
startBridge = null
_init()
_drawDataLine()
return
}
//첫 마우스 다운 지점에서 마지막 마우스 업 지점까지의 거리를 lineData 배열에 담아둡니다
let bridgeIdx = _makeid(50)
startBridge.linkIdx = bridgeIdx
endBridge.linkIdx = bridgeIdx
data[startBridge.dataIndex].push(startBridge) //데이터 배열에도 넣습니다
data[endBridge.dataIndex].push(endBridge)
lineData.push({startBridge, endBridge})
_init()
_drawDataLine()
}
isClicked = false
})
//마우스 아웃 이벤트
canvas.addEventListener('mouseleave', (event) =>{
if(!ctx ) return
isClicked = false
hoverPosition = {}
})
//데이터를 찾는 함수 입니다
function _search(me, linkIndex){
let linkData
let idx
let innIdx
data.forEach( (arg, _idx) => {
if(me != _idx){
arg.forEach((element, _innIdx) => {
if(element.linkIdx == linkIndex){
linkData = element
idx = _idx
innIdx = _innIdx
}
})
}
})
return {linkData, idx, innIdx}
}
let bk = 1 //혹시모를 무한재귀 대비 브레이킹 인덱스 입니다
let historyIndex = [] //히스토리 배열입니다. 이미 지나온 구간은 안가기 위해서 사용 합니다
function gotoDestination(iiddxx, color){
let mainCursor = iiddxx || 0
let innerCursor = 0
let stop = true
historyIndex = []
_init()
_drawDataLine()
while(stop){
if(bk >= 1433) { //혹시모를 무한재귀 대비 브레이킹 구간 입니다
stop = false
}
let start = data[mainCursor][innerCursor]
let end
if(start.linkIdx != null && historyIndex.filter( arg=> arg == start.linkIdx) == 0){ //링크가 있는 지점
//data에서 찾자
let search= _search(mainCursor, start.linkIdx) //linkData, idx
end = search.linkData
mainCursor= search.idx
innerCursor = search.innIdx
historyIndex.push(start.linkIdx)
} else if(data[mainCursor].length <= innerCursor){ //끝지점
stop = false
} else { //링크가 없는지점
end = data[mainCursor][innerCursor+1]
innerCursor += 1
}
if(!end) break //데이터가 없는 마지막 구간이면 종료 합니다
ctx.save()
ctx.beginPath()
ctx.lineCap = 'round'
ctx.lineJoin = 'round'
ctx.lineWidth = 5
ctx.strokeStyle = color || 'red'
ctx.moveTo(start.x, start.y)
ctx.lineTo(end.x, end.y)
ctx.stroke()
ctx.closePath()
ctx.restore()
bk+=1
}
bk = 0
if(calback){
calback(data, lineData)
}
}
return {
find : (index, color)=>{
gotoDestination(index, color)
},
calback : (arg)=>{
if(arg && arg instanceof Function){
calback = arg
}
}
}
}
let lad = ladder('canvas')
document.getElementById('btn1').addEventListener('click', (event) =>{
lad.find(0, 'red')
})
document.getElementById('btn2').addEventListener('click', (event) =>{
lad.find(1, 'blue')
})
document.getElementById('btn3').addEventListener('click', (event) =>{
lad.find(2, 'green')
})
document.getElementById('btn4').addEventListener('click', (event) =>{
lad.find(3, 'purple')
})
document.getElementById('btn5').addEventListener('click', (event) =>{
lad.find(4, 'orange')
})
lad.calback( (data, lineData)=>{
console.log(data)
console.log(lineData)
})이에 영감을 받아서 조금 수정해서
사다리를 생성해볼까 한다.
Node-red의 Custom node 화면에
위와 같이 사다리 선을 2개만 생성한 뒤
선으로 이어서 구현하면 될 것 같다.
Custom Node 소스 작성
1. javascript

module.exports = function(RED) {
    function LowerCaseNode(config) {
        RED.nodes.createNode(this,config);
        var node = this;
        node.on('input', function(msg) {
            msg.payload = msg.payload.toLowerCase();
            node.send(msg);
        });
    }
    RED.nodes.registerType("lower-case",LowerCaseNode);
}
Custom node 의 .js 파일 기본 틀이다.
여기에 필요한 기능들을 Node-red forum을 참조해 작성한다.
node.on('input')은 해당 노드에 입력이 들어왔을 때
동작을 처리하는 부분이다.
따라서 현재 사다리 구현에서는 필요가 없다.
module.exports = function(RED) {
    "use strict";
    function test_l(config) {
        RED.nodes.createNode(this,config);

function ladder(_id, option = {}){
    const canvas = document.getElementById(_id)
    let ctx = canvas.getContext('2d')
    let width = canvas.width
    let height = canvas.height

    let line = option.line || 5  //line

    let calback //콜백용 변수 입니다
    let data = [ ] //모든 데이터가 y축 기준으로 정렬된 배열 입니다
    let lineData = [ ]  //선이 그려지고 난 뒤에 보관되는 배열 입니다

    //마우스 다운여부 변수 입니다
    let isClicked = false
    //마우스가 다운되면서 그리는 경우 끝지점을 담는 변수 입니다
    let hoverPosition = {}
    //마우스 다운인 경우에 처음 기록하는 시작지점 입니다
    let startBridge = null

    //기본 선 굵기와 색상 입니다
    let defaultLineWidth = 3
    let defaultLineColor = '#A6ABCA'

    _init()
    _drawLine()

    //초기화 함수 입니다
    function _init(){
        ctx.save()
        ctx.clearRect(0,0,width,height)
        ctx.restore()
    }
    .
    .
    .
    .
    .
    .
그래서 위와 같이 조건부 없이
바로 사다리 제작 .js 파일의 소스를
그대로 옮겨 적었다.
2. HTML

<script type="text/javascript">
    RED.nodes.registerType('lower-case',{
        category: 'function',
        color: '#a6bbcf',
        defaults: {
            name: {value:""}
        },
        inputs:1,
        outputs:1,
        icon: "file.png",
        label: function() {
            return this.name||"lower-case";
        }
    });
</script>

<script type="text/html" data-template-name="lower-case">
    <div class="form-row">
        <label for="node-input-name"><i class="fa fa-tag"></i> Name</label>
        <input type="text" id="node-input-name" placeholder="Name">
    </div>
</script>

<script type="text/html" data-help-name="lower-case">
    <p>A simple node that converts the message payloads into all lower-case characters</p>
</script>
기본 html 틀이다.
data-template-name 부분은

위 사진의 부분을 나타내고

data-help-name 은 위의 도움말 부분을 나타낸다.
따라서 사다리 화면은 data-template-name 에 구현하도록 한다.
<script type="text/javascript">
    RED.nodes.registerType('사다리',{
        category: '테스트용',
        color: '#ff7f50',
        defaults: {
	    	name: {value:""},
			id : {value : "", required: true},
            startTime : {value : ""},
            endTime : {value : ""},
            heat : {value : ""},
            cool : {value : ""},
            exha : {value : ""},
            led : {value : ""}
        },
        inputs:1,
        outputs:4,
        icon: "file.png",
        label: function() {
            return this.name||"사다리";
        }
    });
</script>

<script type="text/html" data-template-name="사다리">
    <!DOCTYPE HTML PUBLIC "-//W3C//DTD HTML 4.0 Transitional//EN">
<html>

<head>
    <title>ladder</title>
    <meta name="viewport" content="width=device-width, initial-scale=1">
    <meta http-equiv="Content-Type" content="text/html; charset=utf-8">
</head>

<body>
    <div style="display: inline-block;width: 602px;height: 402px;position: absolute;left: 30%;top:3%;">
        <canvas id='canvas' width="600" height="400" style="border: 1px solid gray;"> </canvas>
        <div>
            <br>
            <button type="button" id="btn1">1번</button>
            <button type="button" id="btn2">2번</button>
            <button type="button" id="btn3">3번</button>
            <button type="button" id="btn4">4번</button>
            <button type="button" id="btn5">5번</button>
        </div>
    </div>
</body>

</html>

<script src='ladderTest.js'>
</script>
</script>
위와 같이 HTML 을 작성해보았다.
결과 및 오류
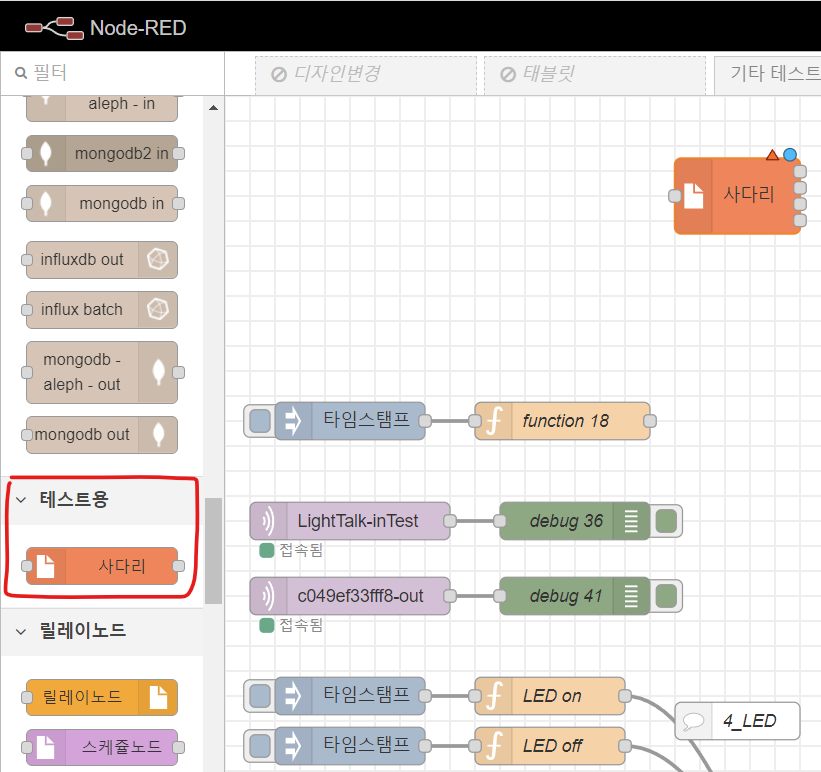
정상적으로 노드가 생성되었다.
하지만 사다리가 생성되지 않는다.
틀의 규격이야 px 값을 줄이면 되지만
사다리 줄이 생기지 않는다.
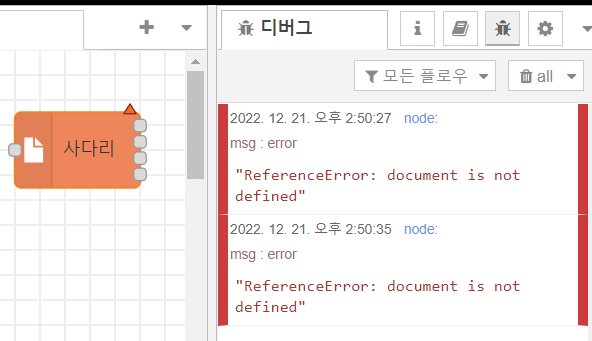
배포 후 위와 같은 오류도 발생한다.
아무래도 html 에서 .js 파일을 호출할 때
오류가 발생하는 것 같다.
module.exports = function(RED) {
    "use strict";
    function test_l(config) {
        RED.nodes.createNode(this,config);

    }
    RED.nodes.registerType("사다리",test_l);
}
function test_1(config) 내부에서
또 다시 사다리를 만드는 function 함수를 실행해서
뭔가 불러오지 못하나? 싶어서
.js 파일은 위와 같이 기본값으로 두고
html 파일에 <script> </script> 태그로
.js 파일을 옮겨주었다.
<script type="text/html" data-template-name="사다리">
    <!DOCTYPE HTML PUBLIC "-//W3C//DTD HTML 4.0 Transitional//EN">
<html>

<head>
    <title>ladder</title>
    <meta name="viewport" content="width=device-width, initial-scale=1">
    <meta http-equiv="Content-Type" content="text/html; charset=utf-8">
</head>

<body>
    <div style="display: inline-block;width: 602px;height: 402px;position: absolute;left: 30%;top:3%;">
        <canvas id='canvas' width="600" height="400" style="border: 1px solid gray;"> </canvas>
        <div>
            <br>
            <button type="button" id="btn1">1번</button>
            <button type="button" id="btn2">2번</button>
            <button type="button" id="btn3">3번</button>
            <button type="button" id="btn4">4번</button>
            <button type="button" id="btn5">5번</button>
        </div>
    </div>
</body>

</html>

<script>
    function ladder(_id, option = {}){
        const canvas = document.getElementById(_id)
        let ctx = canvas.getContext('2d')
        let width = canvas.width
        let height = canvas.height

        let line = option.line || 5  //line

        let calback //콜백용 변수 입니다
        let data = [ ] //모든 데이터가 y축 기준으로 정렬된 배열 입니다
        let lineData = [ ]  //선이 그려지고 난 뒤에 보관되는 배열 입니다

        //마우스 다운여부 변수 입니다
        let isClicked = false
        //마우스가 다운되면서 그리는 경우 끝지점을 담는 변수 입니다
        let hoverPosition = {}
        //마우스 다운인 경우에 처음 기록하는 시작지점 입니다
        let startBridge = null
        .
        .
        .
        .
        ..
위와 같이 html 파일에 모든 소스를 옮겨 작성했다.
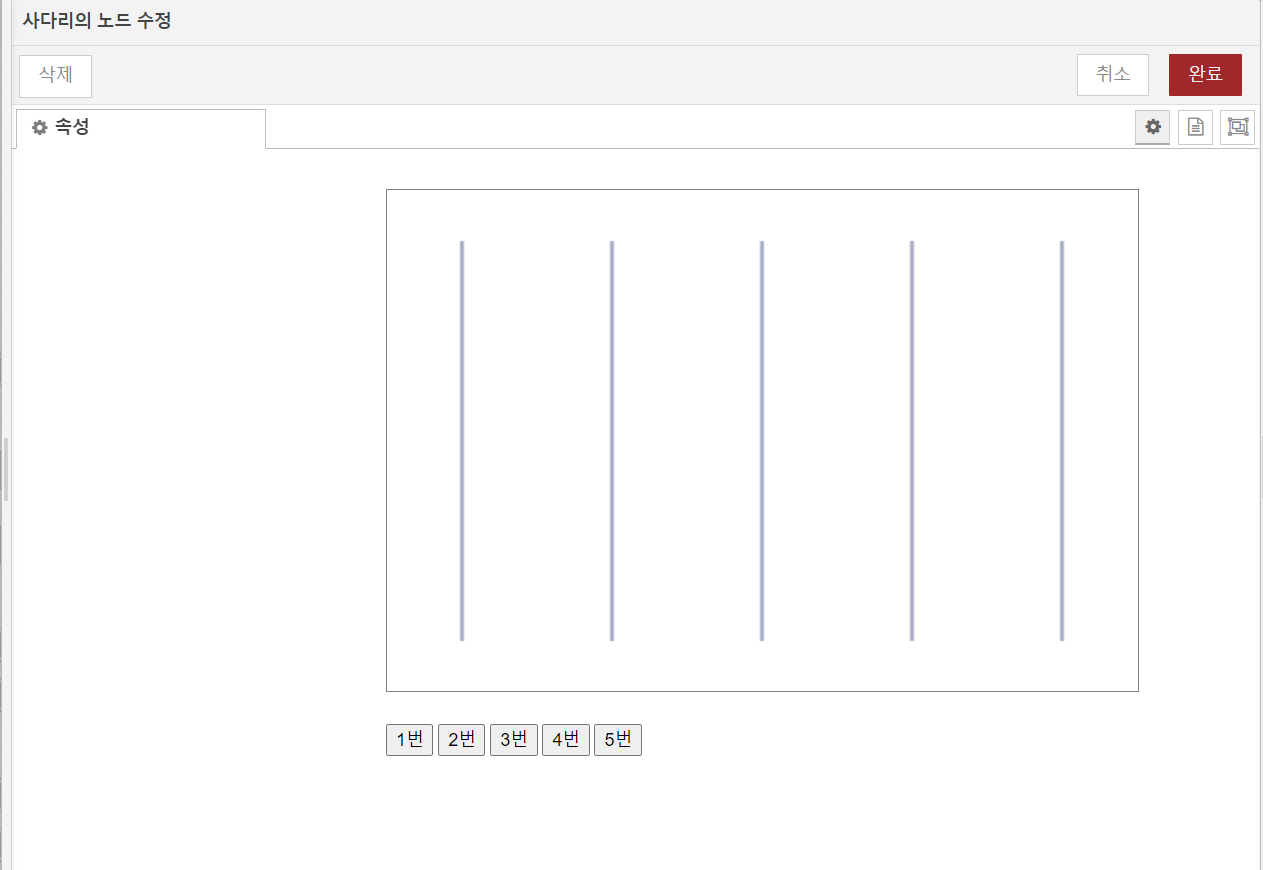
성공적으로 사다리가 생성된다.
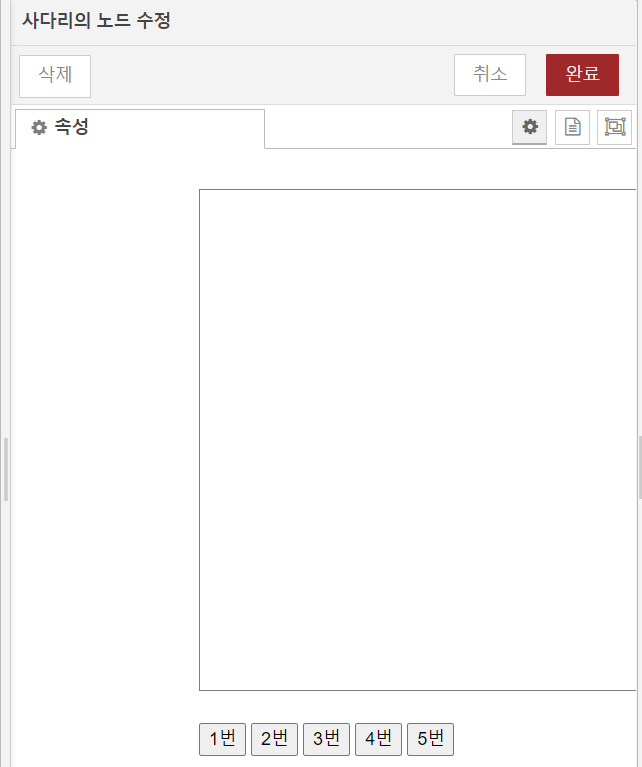
하지만 노드를 저장 후 다시 들어와보면
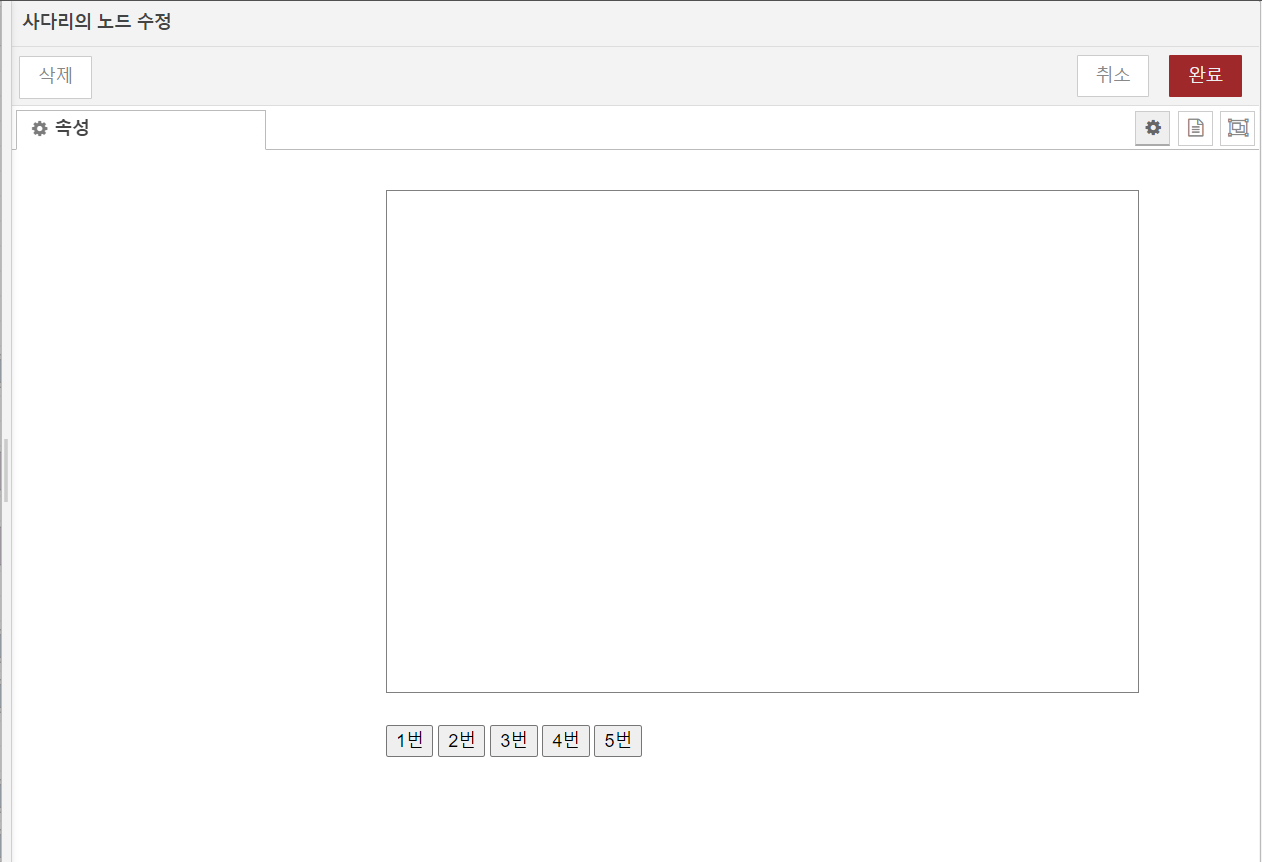
위와 같이 사라진다...
Node-red 창을 새로고침 하면 다시 생기긴 하는데
완료 버튼을 누르고 다시 노드를 더블클릭 해보면
사다리가 사라져있다.

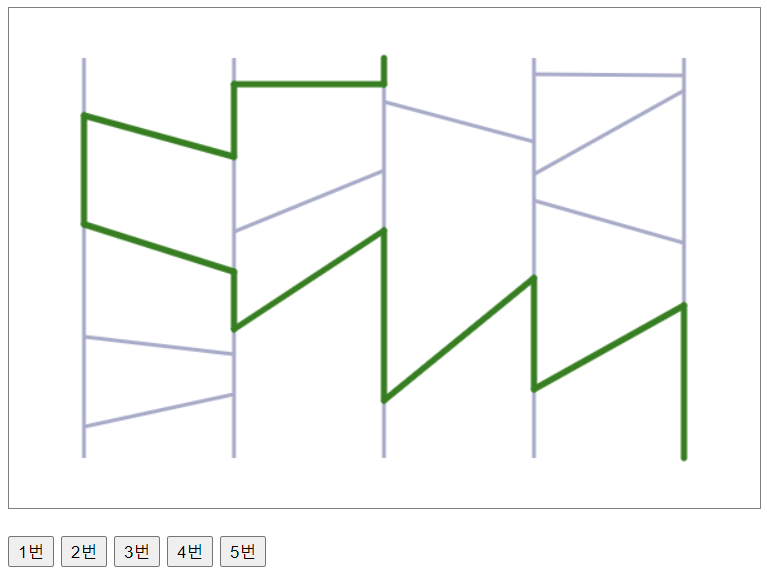
사진에 빨갛게 표시한 부분에서 선을 그리고 있는데
좀 더 아래쪽에 선이 생긴다.
1. 노드 창 벗어나고 나면 사다리 사라짐
2. 마우스 클릭의 좌표가 정확하지 않음
위 두 가지 오류를 앞으로 수정해야 겠다.
'개발 > Node-red' 카테고리의 다른 글
| [Node-red] http 통신 Custom node 제작 (0) | 2022.12.23 |
|---|---|
| [Node-red] Custom node 오류 - 중복사용 불가 (0) | 2022.12.22 |
| [Node-red] Schedule 노드 ( mqtt x ) 제작 (0) | 2022.12.09 |
| [Node-red] Relay node 제작 - 2 (0) | 2022.12.07 |
| [Node-red] Relay node 제작 (0) | 2022.12.05 |